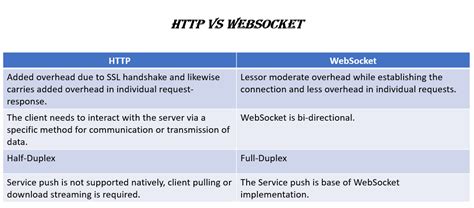
Websoket connection starting and stopping from the GUI application using the Binance website
You can, as a developer, have situations in which you need to control the flow of the program from the applications of the user interface (GUI). In this article, we will explore how to create a simple system based on the GUI that starts and stop a web science connection using the Binance Websocket Library.
PREVIOUS REQUIREMENTS
node.js.org).NPM Install Binance-Webocket).Example of code
`JavaScript
// import the necessary libraries
Const {websockt} = ask ('binance-Websocket');
Const {createinterface} = ask ('readline');
// Initialize the websockt connection
Consto websockt = new web boots ({{
Host: "Your Binance- Exchange.com",
Port: 3000,
});
// Establish the GUI event loop
Const gui = createinterface ({{
Entrance: process.stdin,
Departure: Process.stdout,
});
// Function to start/stop the websocket connection
Handlstart Function () {
Websockt.on ('Connect', () => {
Console.log (the websockt connection is created. Home ... ');
// Start a new task when the user press Enter
Gui.once ('line', line => {
if (line === 'start') {
Websockt.send ({Team: 'Start'});
Settimaut (() => {
Console.log ('Stop Websockt Connection ...');
Websockt.close ();
}, 5000);
}
});
// Start a new task when the user presses Ctrl+C
Process.on ('Sigint', () => {
Gui.kill ();
});
});
}
// Function to start/stop the websockt connection from the command line
Handlstartcommand function () {
Const readline = ask ('readline');
Const rl = readline.createinterface ({{
Entrance: process.stdin,
Departure: Process.stdout,
});
RL.Question ('Start (Type "stop" to stop), answer => {
If (answer.tolowercase () === 'start') {
Websockt.send ({Team: 'Start'});
Settimaut (() => {
Console.log ('Stop Websockt Connection ...');
Websockt.close ();
handlestopcommand ();
}, 5000);
} else if (answer.tolowercase () === 'stop') {
handlestopcommand ();
} others {
Console.error ('Invalid entry. Exit ...');
Handlstartcommand ();
}
});
}
// Function to stop the web pocket connection
HandingCommand function () {
Websockt.send ({team: 'close'});
}
// The main program loop
While (True) {
Handlstart ();
}
`
How does it work?
Tips and variations
